Revitalize Your Leather: A Simple 7-Step Guide to Dyeing Like a Pro
Is your leather gear feeling a bit tired, longing for a fresh new look? Fear not, for within these seven steps lies the secret to revitalizing your beloved leather treasures. Let’s roll up our sleeves and give your leather goods the makeover they deserve in this guide; Revitalize Your Leather: A Simple 7-Step Guide to Dyeing Like a Pro.
Step 1:
Set Up Your Spot First things first, let’s prep your workspace. Whether you’re indoors or out, find a comfy spot to get down to business. Crack open a window, turn on a fan, and let’s make sure we’re ready to rock.
Step 2:
Strip It Down Time to strip away the old stuff and get down to the bare bones. Grab your deglazer and give your leather a good rubdown. It’s like hitting the reset button for your favorite pieces!
Step 3:
Wet It Down Now, let’s add a little moisture to the mix. Grab a spray bottle of Kunguru leather Dye and give your leather a light misting. This step helps the dye soak in nice and even, giving you that pro finish.
Step 4:
Paint It On Get ready to unleash your inner artist! Grab your brush and start painting on that dye. Don’t worry about being perfect—just have fun with it! It’s all about bringing your leather back to life in style.
Step 5:
Time to Chill Now, sit back and relax while your leather works its magic. Give it some time to dry and let the colors really pop. Maybe grab a snack or catch up on your favorite show while you wait.
Step 6:
Layer It Up Once that first coat is dry, it’s time to add some depth. Grab your brush again and layer on another coat of dye. The more layers, the richer the color—so don’t be shy!
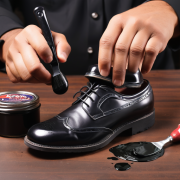
Step 7:
Shine It Up Last but not least, let’s add the finishing touches. Grab your conditioner and give your leather a good buffing. Watch as it shines like new, ready to turn heads wherever you go.
FAQs About Dyeing Leather
How difficult is it to dye leather?
Dyeing leather isn't as daunting as it may seem. In fact, many would argue that it's a task anyone can tackle with the right approach and a dash of patience. The key lies in allowing each layer of dye to dry thoroughly, a process that may require some waiting time. So, grab your brush, exercise some patience, and you'll be amazed at the results!
How do you dye leather properly?
Proper preparation is the cornerstone of successful leather dyeing. Begin by using a deglazer or leather preparer to remove any existing protective coatings, allowing the dye to penetrate the leather fibers effectively. Follow this up with a light layer of water to prepare the surface for optimal dye absorption. With these steps in place, you'll set the stage for a vibrant and long-lasting dye job.
Is it better to dye or paint leather?
While the terms "dyeing" and "painting" may seem distinct, they're essentially two sides of the same coin when it comes to leather. When you dye leather, you're essentially painting the dye onto the surface using a brush. In essence, both methods achieve the same result—a beautifully colored leather item. So, whether you prefer to use the term "dye" or "paint," rest assured that you're embarking on a journey to rejuvenate your leather with a fresh new hue.
Will the color of the leather change over time?
Yes, it's natural for the color of dyed leather to evolve subtly over time. Factors such as exposure to sunlight, handling, and environmental conditions can influence the color's intensity and hue. Embrace this natural evolution as part of the leather's character and charm, knowing that it adds to the uniqueness of your piece.
Can I dye leather items other than clothing or accessories?
Absolutely! Leather dyeing isn't limited to just clothing and accessories. You can breathe new life into a variety of leather items, including furniture, upholstery, and even car interiors. With the right techniques and products, you can transform virtually any leather surface into a personalized work of art.
How long does it take for dyed leather to dry completely?
The drying time for dyed leather can vary depending on factors such as humidity, temperature, and the type of dye used. In general, it's best to allow for at least 24 hours for the leather to dry thoroughly between coats. Be patient and resist the temptation to rush the process, as proper drying ensures a durable and vibrant finish.
Can I mix different colors of dye to create a custom shade?
Yes, experimenting with different dye colors can yield exciting results and allow you to create a custom shade that suits your preferences. Mix small amounts of dye in a separate container to achieve your desired color, and test it on a small, inconspicuous area of the leather before applying it to the entire surface. This way, you can fine-tune your custom hue without risking the integrity of your leather item.